Using the Gallery Module, you can display your Google Drive images on your website in a masonry grid layout with a lightbox preview. This module lets you create a stunning photo and video gallery and display it to your users.
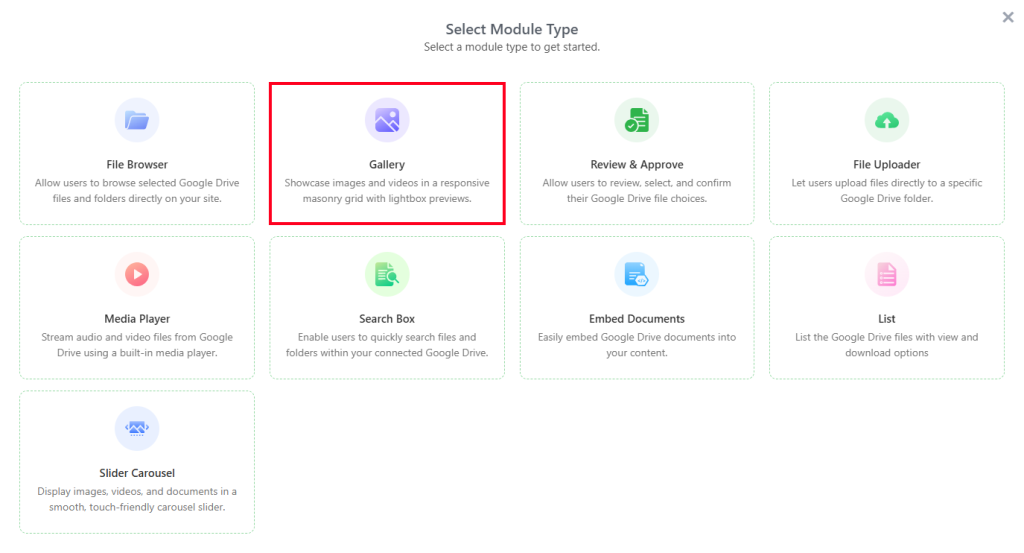
Step-1: Choose Gallery Module
- Navigate to Google Drive.
- Go to Module Builder from your WordPress dashboard.
- Click on Add New Module.
- Select the Gallery module.
- Change the module title as per your project type.
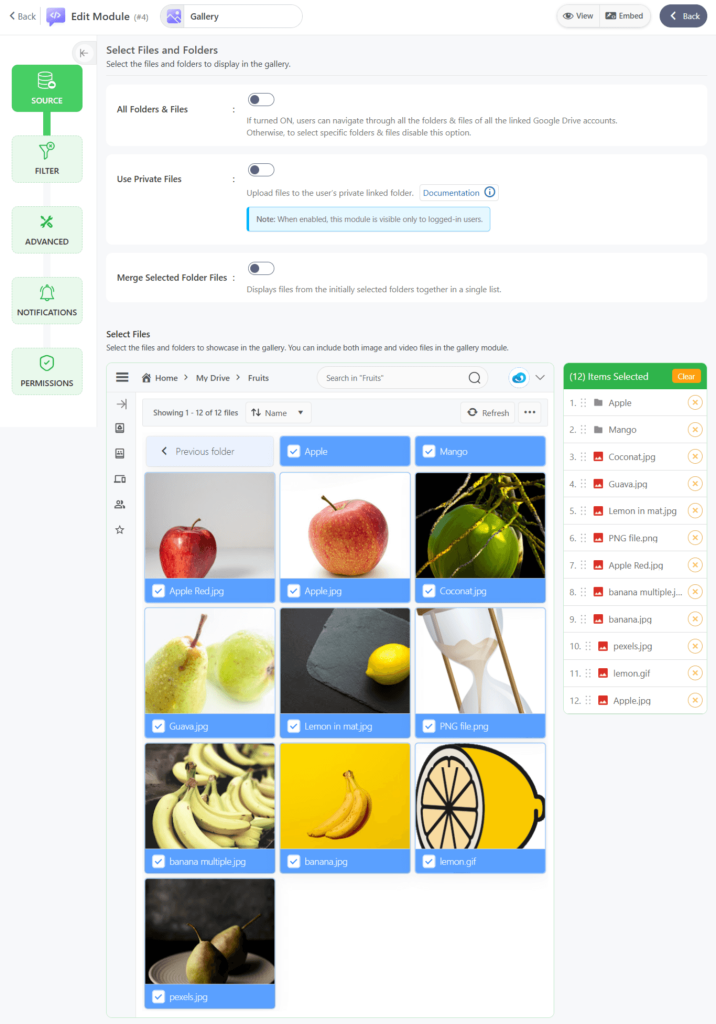
Step-2: Configure Sources Tab
Now you will be redirected to the next step, the Source Tab. Here, you need to select your source files from Google Drive.
You will discover your selected files in the selected files list section of your screen. You can drag them up or down to change their orders.
- All Folders & Files: If All Folders & Files is enabled, visitors can navigate through all the folders & files of all the linked Google Drive accounts.
- Use Private Folder: Turn ON to upload the files to the private folder linked to the user. Note: If enabled, this module will be visible only to logged-in users.
- Create Private Folder: Turn ON to create and link a folder automatically to the user who has not linked any folder yet, while the user views the module.
- Folder Name Template: Set the folder name template for the automatically created private folders.
- Parent Folder: Select the parent folder where the automatically created private folders will be created.
- Template Folder: Select the template folder that will be copied to the new private folder.
- Create Private Folder: Turn ON to create and link a folder automatically to the user who has not linked any folder yet, while the user views the module.
- Use ACF field Files: Enable this option to use the ACF field files dynamically as the source for the module. Enter the ACF field name in the ACF Field Key input box to use the files from the ACF field.
- Merge Selected Folder Files: Displays files from the initially selected folders together in a single list.
- Include Subfolder Files: Includes files from all subfolders of the selected folders in the merged list.
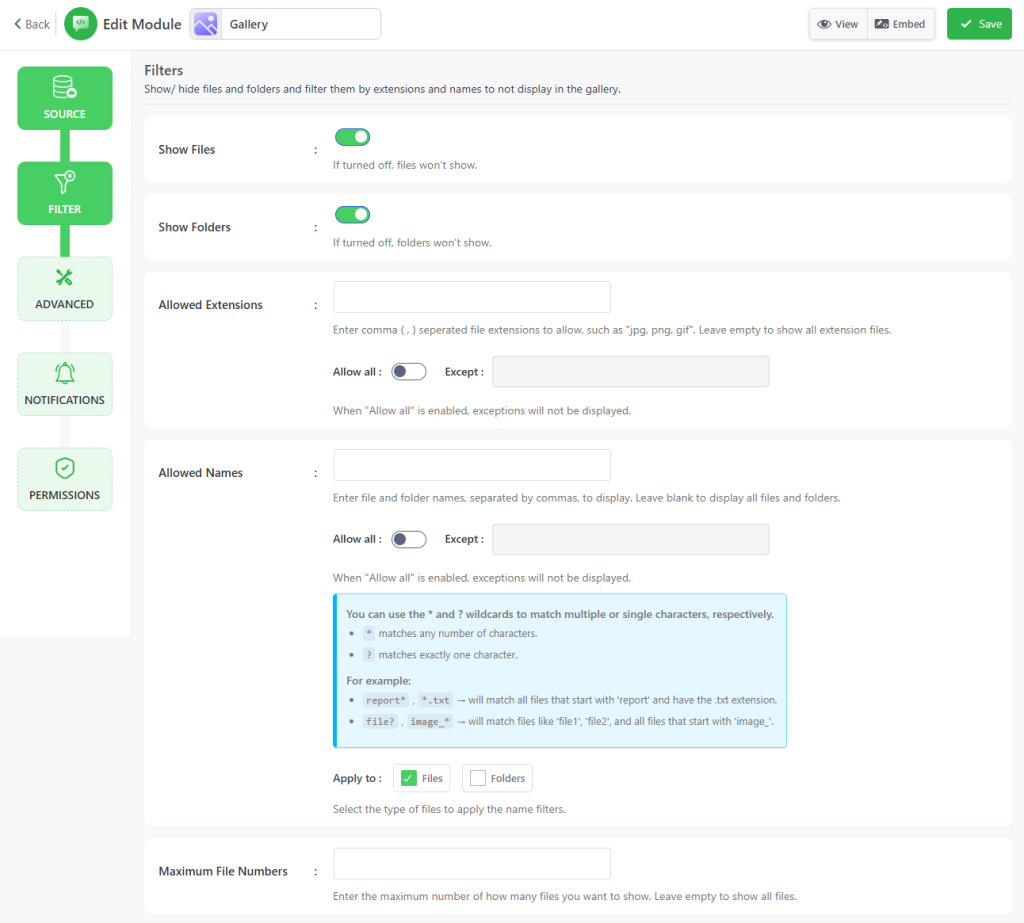
Step-3: Configure Filter Tab
Now you are in the Filter Tab. You can customize every file and folder that you want to allow/ disallow their visibility.
- Show Files: The Show Files option is given to show or hide your files. If it’s enabled, files will show; files will be hidden for the users.
- Show Folders: The Show Folders option is given to show or hide your folders. If it’s enabled, the folders will be shown; otherwise, the folders will be hidden from the users.
- Allowed Extensions: Enter comma (,) separated file extensions to allow, such as “jpg, png, gif”. Leave empty to show all extension files. When “Allow all” is enabled, exceptions will not be displayed.
- Allowed Names: Enter file and folder names, separated by commas, to display. Leave blank to display all files and folders. When “Allow all” is enabled, exceptions will not be displayed. You can also limit files & folder.
- Maximum Item Count: Enter the maximum number of files you want to show. Leave empty to show all files.
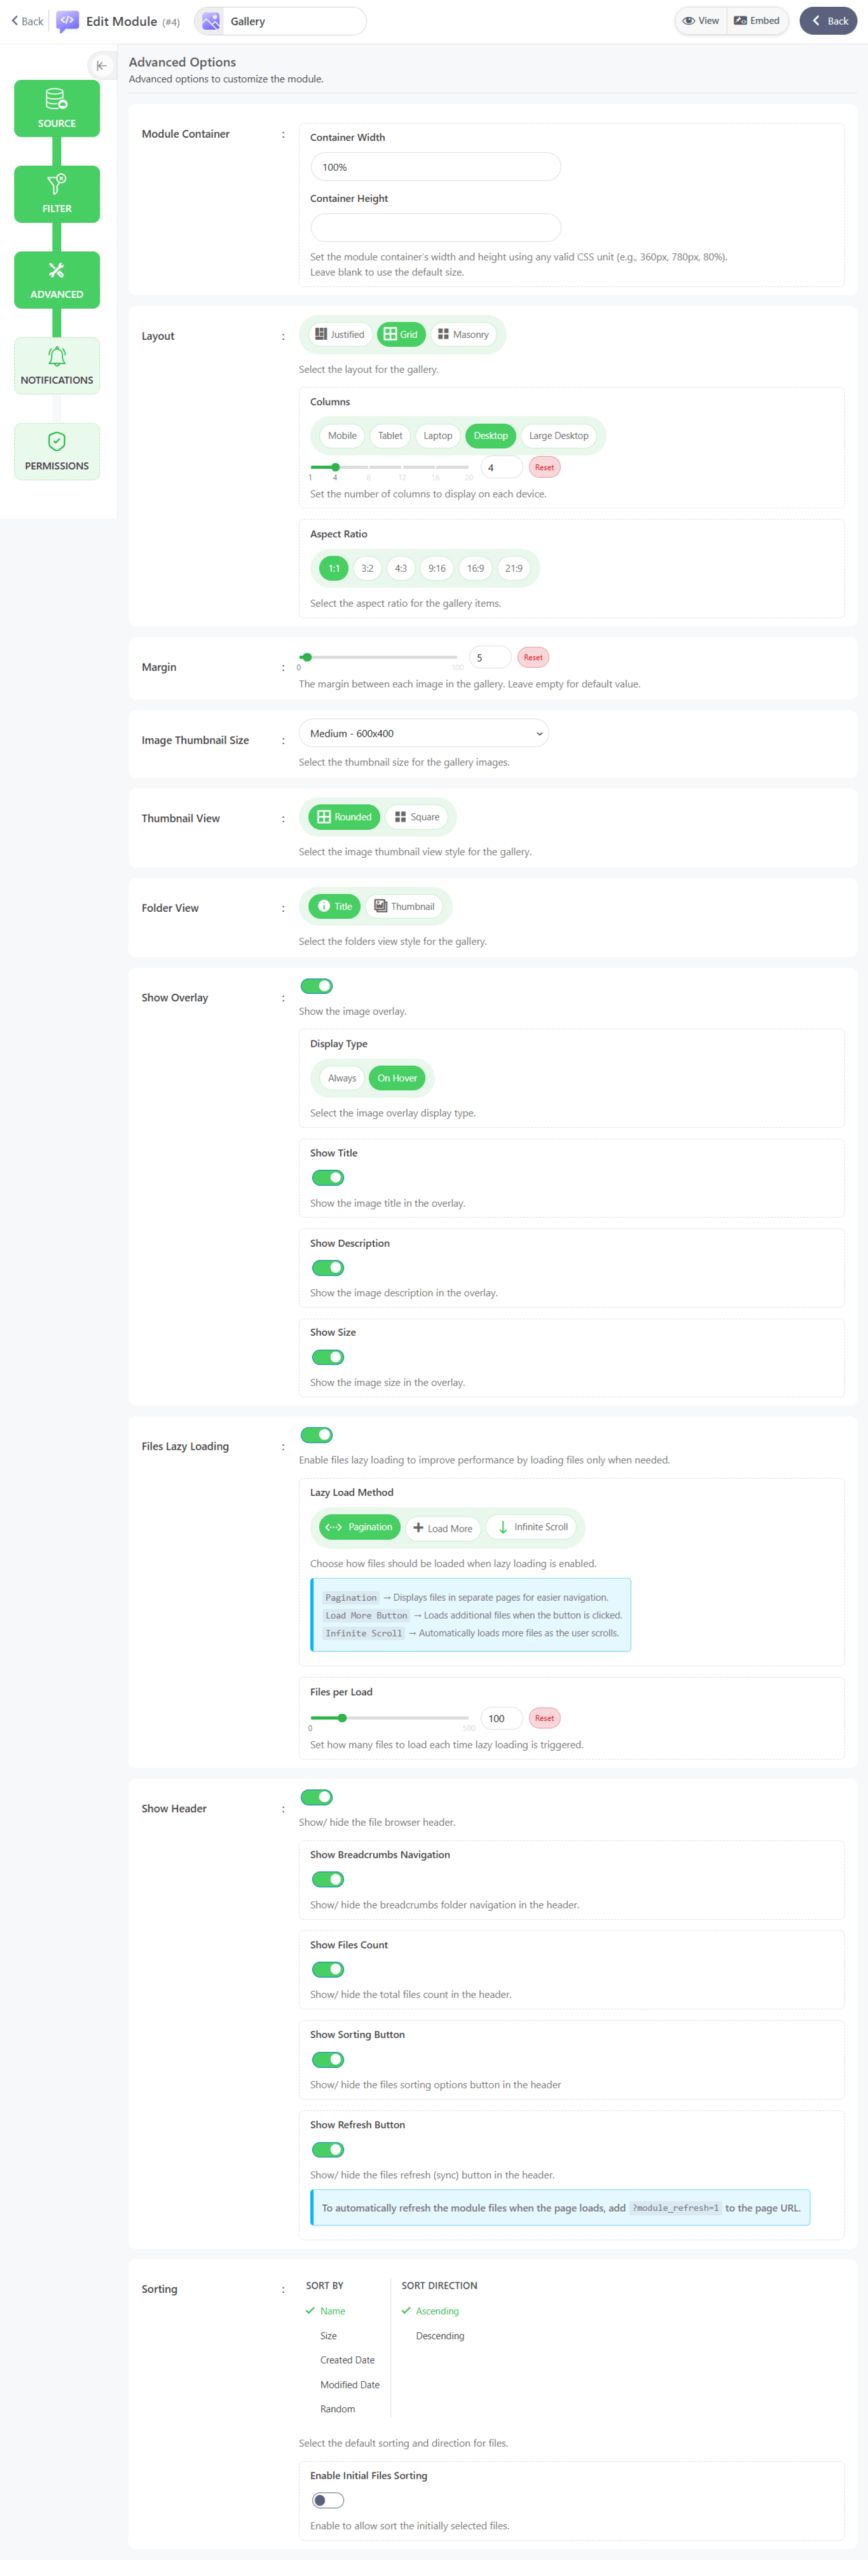
Step-4: Configure Advanced Tab
The next step is to set up advanced options. You can do multiple customizations depending on your test and needs.
- Module Container: Set the module container width and height. You can use any valid CSS unit (pixels, percentage), e.g., ‘360px’, ‘780px’, ‘80%’. Keep blank for a default value.
- Layout: You can display the Gallery module in 3 different layouts (Justified, Grid, and Masonry). Select the preferred layout and customize it.
- Justified
- Row Height: The ideal height you want your grid rows to be. It won’t set it exactly to this, as the plugin adjusts the row height to get the correct width. Leave empty for the default value.
- Grid
- Columns: Set the number of columns to display on each device (Mobile, Tablet, Laptop, Desktop, and Large Desktop).
- Aspect Ratio: Select the aspect ratio for the gallery items. Ex: 1:1, 3:2, 4:3, 9:16.
- Masonry
- Columns: Set the number of columns to display on each device (Mobile, Tablet, Laptop, Desktop, and Large Desktop).
- Justified
- Margin: The margin between each image in the gallery. Leave empty for a default value.
- Image Thumbnail Size: Select the thumbnail size for the gallery images.
- Thumbnail View: You will get 2 different thumbnail view styles for the Gallery module (Rounded & Square). Select the image thumbnail view style for the gallery.
- Folder View: You will notice 2 different folder view styles (Title & Thumbnail). Select the folder view style for the gallery.
- Show Overlay: This feature shows the image overlay on mouse hover.
- Display Type: Select the image overlay display type (Always & On Hover)
- Show Title: Show the gallery item title on hover overlay.
- Show Description: Show the gallery item description on hover overlay.
- Show Size: Show the gallery item size on the hover overlay.
- Enable Lazy load: Enable files lazy load to avoid loading all files at once.
- Files Loading Type: Select the file loading type for the lazy load.
- Scroll – Loads more files as the user scrolls to the bottom.
- Pagination – Navigate through files using page numbers.
- Load More Button – Load files with a button click.
- Number of Files to Load: Set the number of files to load on each lazy load.
- Files Loading Type: Select the file loading type for the lazy load.
- Show Header: Show/ hide the file browser header.
- Show Breadcrumbs Navigation: Show/ hide the breadcrumbs folder navigation in the header.
- Show Refresh Button: Show/ hide the refresh (sync) button in the header.
- Show Sorting Button: Show/ hide the files sorting options button in the header
- Sorting: Using this feature, you can sort files by Name, Size, Created Date, Modified Date, Ascending, or Descending Direction. Select the option you are thinking of implementing.
- Enable Initial Files Sorting: Enable to allow sorting the initially selected files.
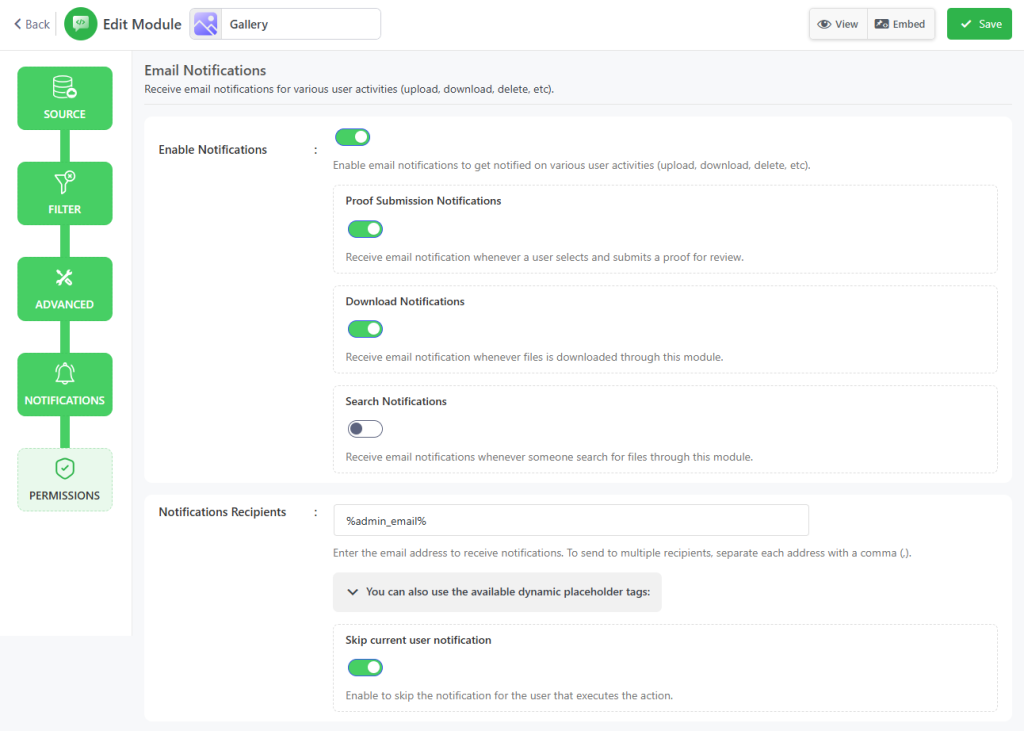
Step-5: Configure Notifications Tab
Now you will be redirected to the Notifications tab, where you will customize notification settings configuration.
- Enable Notifications: Enable email notifications to get notified on various user activities (upload, download, delete, etc).
- Proof Submission Notifications: Receive email notification whenever a user selects and submits a proof for review.
- Download Notification: Receive an email notification whenever files are downloaded through this module.
- Search Notification: Receive email notifications whenever someone searches for files through this module.
- Notification Recipients: Enter the email address where the notifications will be sent. Add multiple email addresses by separating them with a comma (,). You can also set the placeholder tags below as email recipients. Ex: %admin_email%, %user_email%, %linked_user_email%
- Skip Current User Notification: Enable to skip the notification for the user who executes the action.
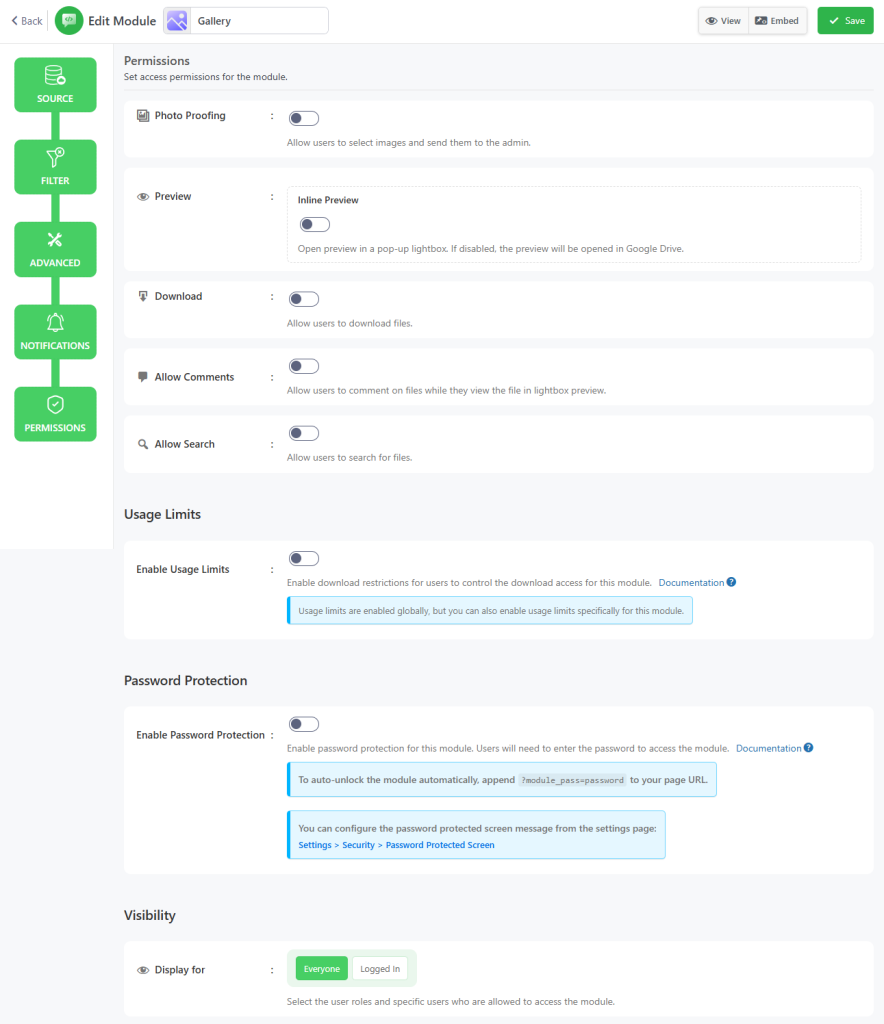
Step-6: Configure Permissions Tab
Now you will be redirected to the Permissions tab. Here you will mostly work on permission-related tasks.
- Photo Proofing: Allow users to select images and send them to the admin.
- Button Text: Enter the text for the proof selections submit button.
- Maximum Selection: Enter the maximum number of items that can be selected. Leave empty for no limit.
- Enable Tags: Allow users to add tags to their selections.
- Available Tags: Create and select the tags that users can use.
- Filter Users & Roles: Select users & roles who can be selected.
- Preview: Allow users to preview the module.
- Inline Preview: Open preview in a pop-up lightbox. If disabled, the preview will be opened in Google Drive.
- Allow Pop-out: Allow users to preview the file in Google Drive’s native viewer by clicking the pop-out button.
- Media Preview Mode: Choose how images, audio, and video files are displayed: direct media (browser-native) or Google Drive’s native embed viewer.
- Show Preview Thumbnails: Show/ hide the file thumbnails at the bottom of the lightbox preview.
- Download: Allow users to download files.
- Folder Download: Allow users to download entire folders as a ZIP file.
- Multiple Files Download: Allow users to download multiple files as a ZIP file.
- Filter Users & Roles: Select users & roles who can download files.
- Allow Search: Allow users to search for files.
- Full-text Search: Allows searching in file content, descriptions, tags, and other metadata.
- Initial Search Term: Set initial search terms if you want to start a search when the shortcode is rendered. Please note that this only affects the initial render. You can also set dynamic placeholder tags to the initial search term. Ex: %post_id%, %post_title%, %post_slug%
- Filter Users & Roles: Select users & roles who can search for files.
- Usage Limits: Enable download restrictions for users to control the download access for this module.
- Daily Downloads Limit: Set the maximum number of downloads allowed per day for users. Keep blank for unlimited.
- Daily Download Limit / File: Set the maximum number of times the same file can be downloaded by users per day. Keep blank for unlimited.
- Daily Bandwidth Limit: Set the maximum bandwidth (MB) allowed per day for users. Keep blank for unlimited.
- Exclude Users & Roles: Select the roles and users who will be excluded from the download restrictions.
- Exclude All: When activated, the download restrictions will only be applied to the selected roles and users.
- Display for: Select the user roles and specific users who are allowed to access the module.
- Everyone: Display the module for everyone.
- Logged In: Display the module for logged-in users only.
- Filter Users & Roles: Select the users and user roles who can see the module.
- Everyone Expect: When activated, the module will be visible to everyone except for those specifically exempted.
- Show Denied Message: Show a message to users who don’t have access to the module.
- Display Login Screen: Display a login message for the modules when authentication is required.
Click Save Changes and copy the shortcode from the module builder page.
Now you can use the shortcode to display your Google Drive photos with the help of the Photo Gallery module, inside any posts or pages.
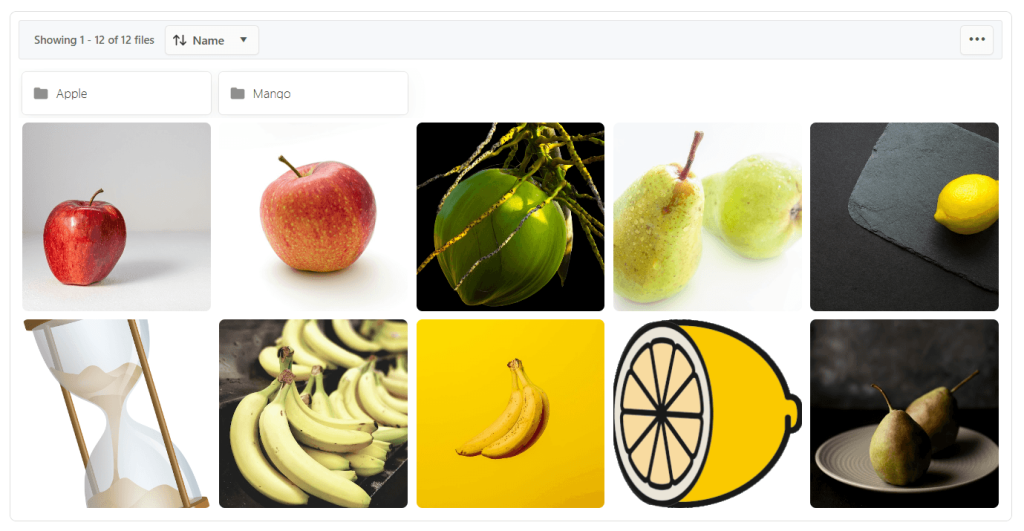
Output
This is how the gallery module will look once you embed it inside any of your pages or posts.